SoCKit Quick Start Guide
Do this first
- Image the SD card
- Configure the board
Get your board up and running with two easy setup options:
Connect using a laptop or desktop PC
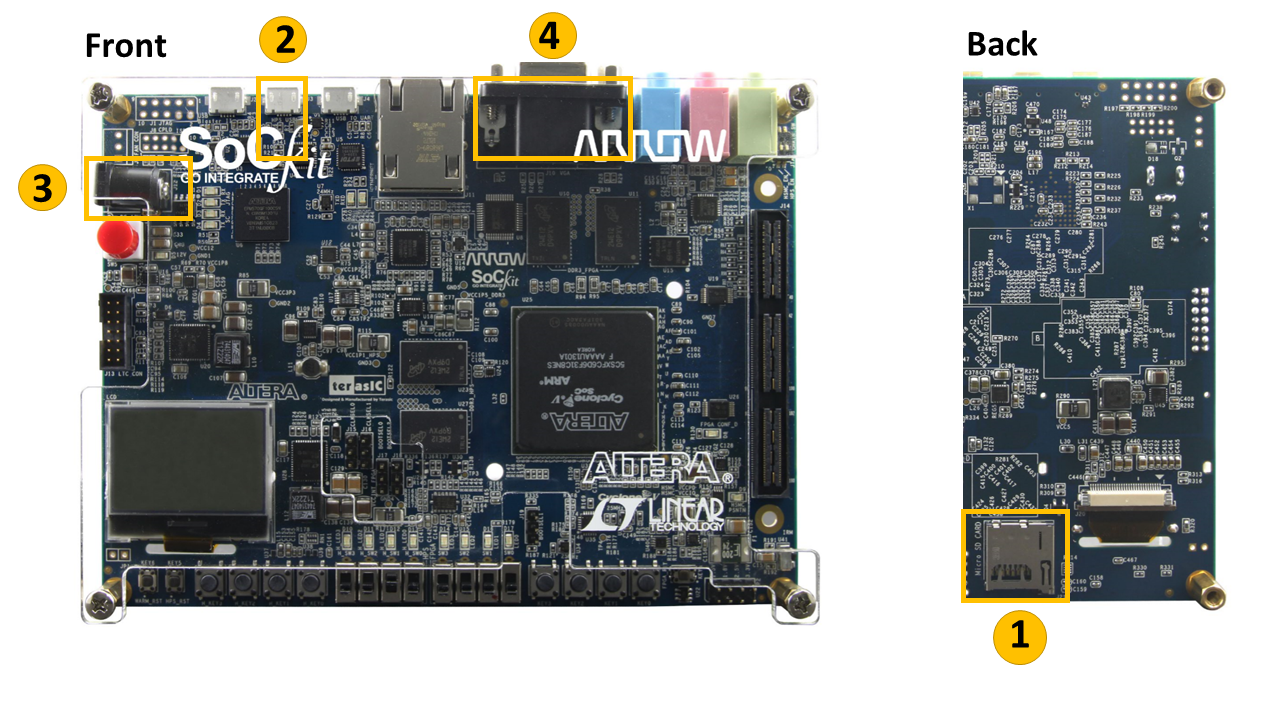
- Ensure the micro SD card is fully inserted into the board.
- Connect the micro (or mini depending on your kit revision) USB cable between the SoCKit board and PC.
- Plug in the DC power supply.
- Look for a mass storage device in the PC’s file explorer.
- Open the drive and click on start.htm.
- Follow the remaining directions displayed on the webpage.

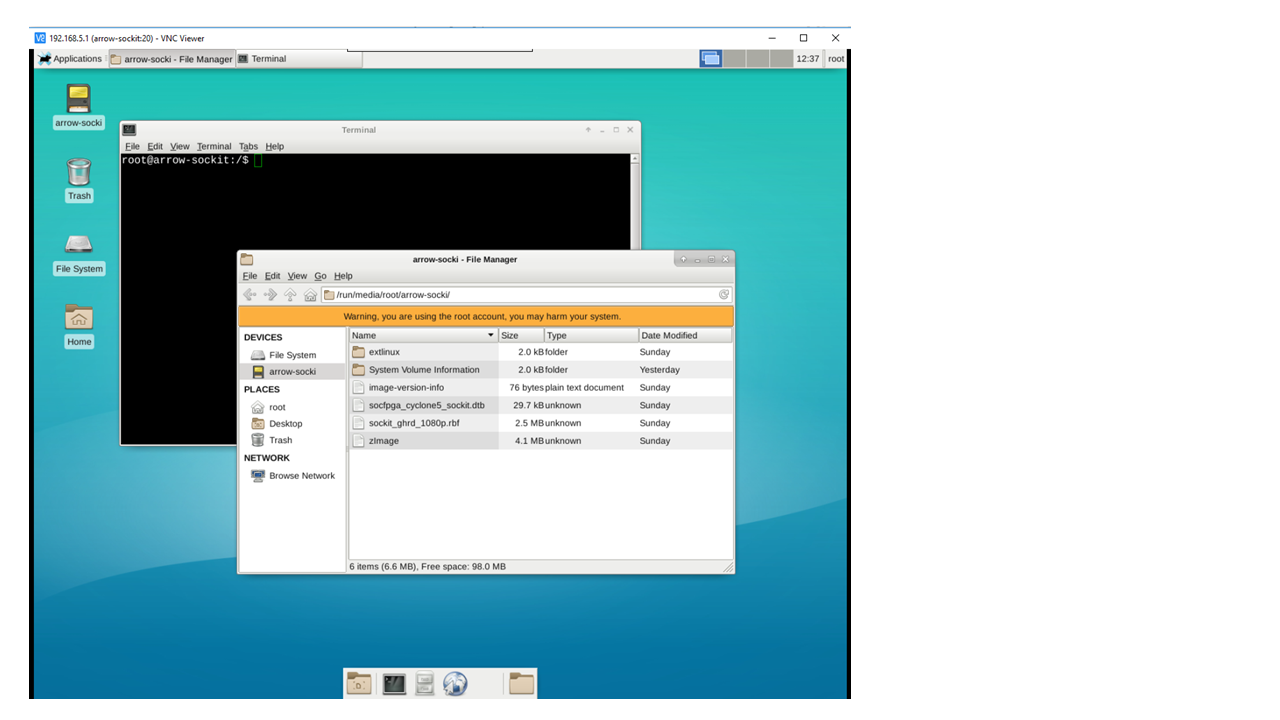
Screenshot of XFCE Desktop via VNC

Connect using a monitor, keyboard, and mouse
- Ensure the micro SD card is fully inserted into the board.
- Connect a USB OTG cable adapter (micro or mini depending on your kit revision) to the OTG port. Connect a USB hub to the adapter. Connect a keyboard and mouse to the hub. A wireless Bluetooth USB keyboard/mouse dongle may also be used.
- Plug in the DC power supply.
- Connect a VGA cable between the SoCKit board and your LCD Monitor*, then power on the monitor.
* Currently supporting 1080p60 monitor resolution
* Adapter Cables can be purchased here
- USB A Female to Mini USB B
- USB A Female to Micro USB B

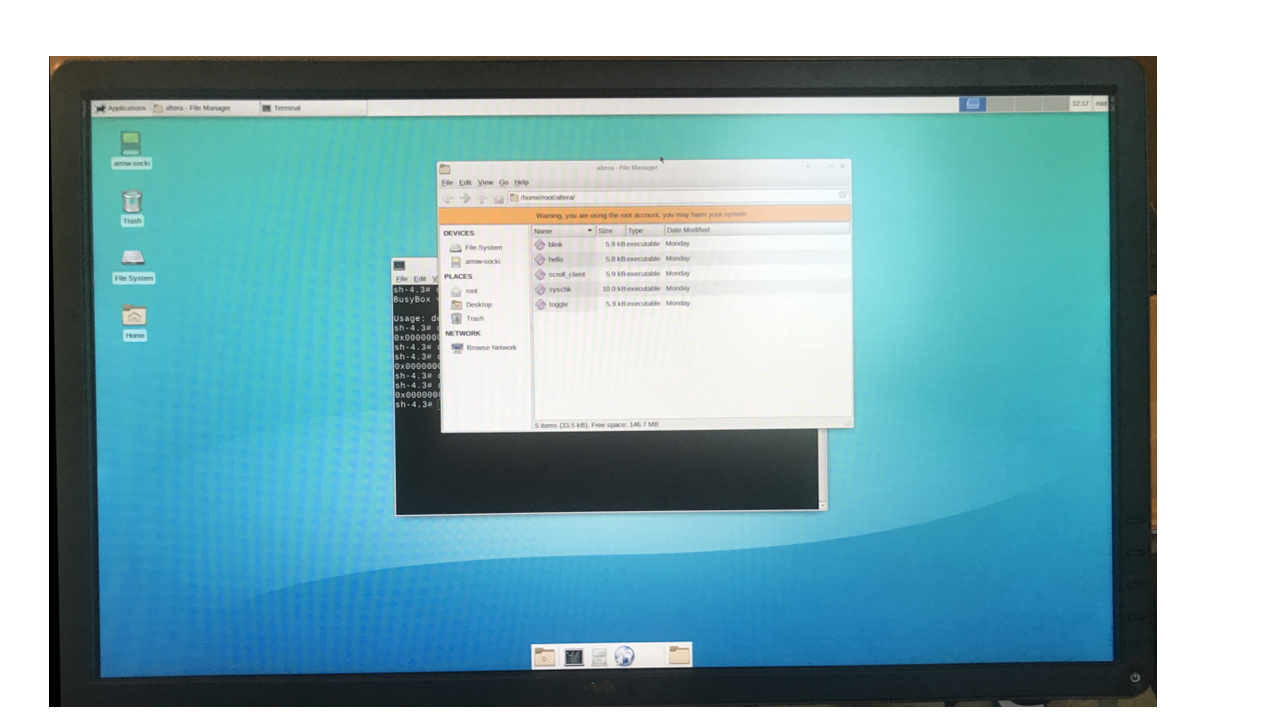
Screenshot of XFCE Desktop on 1080p Monitor

Introduction
Arrow is pleased to provide the easiest way to learn about and develop with Altera’s SoC solutions: our SoCKit. The Arrow SoCKit was developed to help engineers take full advantage of these new solutions and help them see how simple designing with these devices can be.
Combining the latest Cortex-A9 embedded cores with industry-leading programmable logic, Altera’s new SoC solutions give you ultimate design flexibility with unparalleled ease. Altera SoC s integrate an ARM-based hard processor system (HPS) consisting of processor, peripherals, and memory interfaces, with the FPGA fabric using a high-bandwidth interconnect backbone. That means you get the performance and power savings of hard Intellectual Property (IP) and the flexibility of programmable logic.
Purchase a kit from parts.arrow.com https://www.arrow.com/en/products/sockit/arrow-development-tools

Key Features
Each SoCKit features:
- Altera Cyclone V SoC with Dual ARM® Cortex®-A9 processors and 110K LEs
- High Speed Mezzanine Connector (HSMC) including transceivers
- Two banks of low-power DDR3 memory
- MicroSD card and Ethernet 10/100/1000 interfaces
- Adjustable clock output by Silicon Labs
- Graphic LCD: 128 x 64 (SPI Interface)
- VGA and Audio connections
- USB 2.0 OTG (Full Speed) and USB to UART connections
- 3-Axis digital accelerometer and temp sensor
- User’s manual/start-up guide, USB and Power Cables
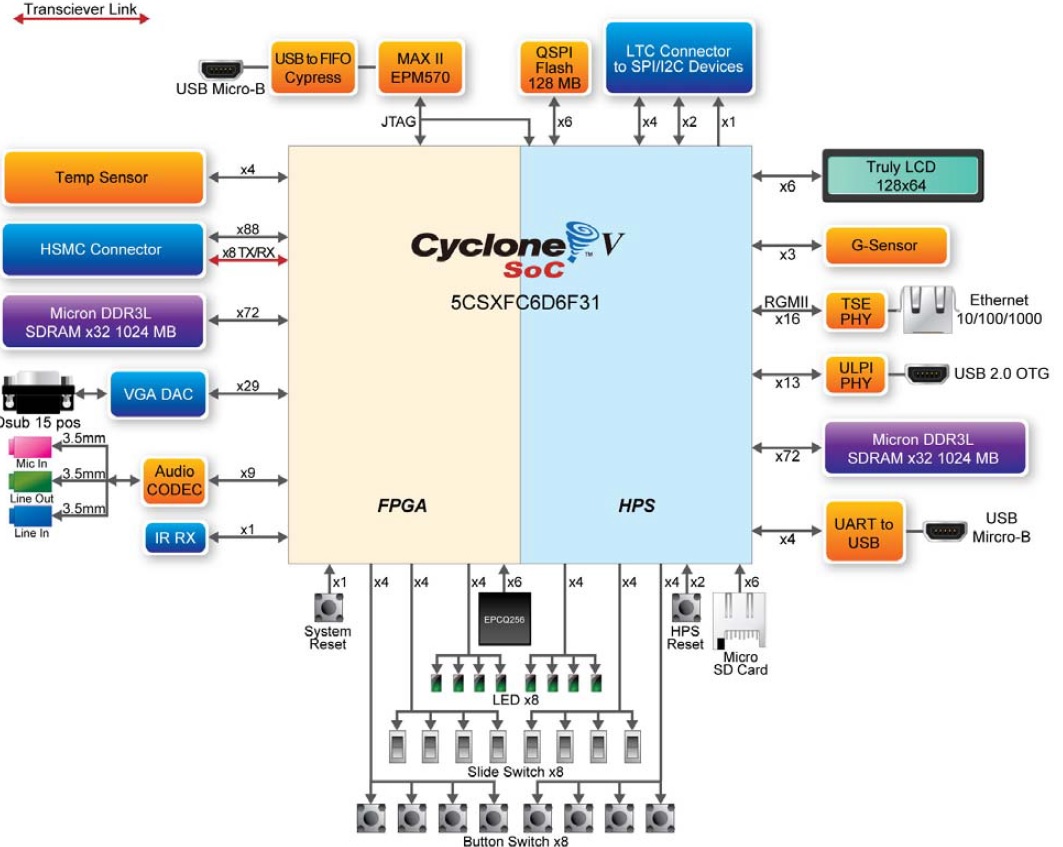
Block Diagram

The
Golden Hardware Reference Design (GHRD) for the Arrow SoCKit Board provides a starter reference design. It includes a Qsys reference design that maps a number of HDL based FPGA peripherals to the HPS and the Cortex-A9 processors. This design is intended as a starting point for new designs.
The current release of the GSRD features two GHRD reference designs.
- Standard GHRD (sockit-ghrd-16.1)
- Standard GHRD with a video pipeline supporting 1080p60 streams (sockit-ghrd-1080p-16.1).
The 1080p example requires a VIP suite IP license in order to generate an rbf file when rebuilding. The github archive does provide a compiled rbf that can be used for demonstration purposes.
Building the Hardware Reference Design
The GHRD can be compiled using the Quartus GUI or from an embedded command shell. Select one of the methods shown below.
- Using the Quartus GUI
- Using make utility
A full build should take between 25 to 60 minutes.
SoCKit Golden System Reference Design (GSRD)
The Golden System Reference Design (GSRD) for the Arrow SoCKit Board consists of a Yocto BSP layer used to build the components required to boot the ARM HPS (Hard Processor System) to Linux. Components of the BSP layer make use of outputs from the Hardware Design (compiled separately).
- Hardware components (precompiled):
- Handoff files
- FPGA programming file (.rbf)
- Software components:
- Device Tree and Device Tree Overlay (.dtb and .dtbo)
- U-Boot v2017.03 (with preloader)
- Linux Kernel v4.1.33-ltsi (zImage)
- Angstrom Distribution v2016.12 Root Filesystem
Building the GSRD
Linux Host Build System Setup
Building the Software Reference Design requires a Linux host (native or Virtual Machine). If you are building using a Virtual Machine, it is recommended that you set the "Number of processor cores" option in your Virtual Machine software settings to the maximum number available. For example, for a quad core CPU with hyper-threading, you would use a setting of 8. The bitbake task execution engine will run multiple processes in parallel, significantly reducing build times. The number of available processor cores is automatically detected and applied in the local.conf file used by the Yocto build system.
Refer to the table below for currently supported and tested host build system Linux distributions for the Yocto Project 2.2:
| Yocto Project 2.2 Supported Distributions |
Status |
|---|
| Ubuntu (14.04, 14.10, 15.04, 15.10, 16.04) |
14.04, 16.04 - PASSED |
| Fedora (22, 23, 24) |
UNTESTED |
| CentOS (7.x) |
7-1611 - PASSED |
| Debian GNU/Linux (8.x Jessie) |
UNTESTED |
| openSUSE 13.2, 42.1 |
13.2, 42.2 - FAILED |
Using the Yocto Build Scripts
Rebuilding the
Golden System Reference Design (GSRD) User Manuals is accomplished by simply running 2 scripts:
- yocto-packages.sh - detects your host build system Linux distribution and installs a set of essential packages required by the Yocto Project 2.2
- yocto2.2-build - Yocto build script that allows you to build individual components or complete image for the Arrow SoCKit board (use --help to see available build options). The output of this script is a complete SD card image that can be copied to a micro SD card and used to boot the board.
Create a Yocto build directory:
$ cd ~
$ mkdir -p work/sockit && cd work/sockit
Install required packages:
$ wget https://raw.githubusercontent.com/arrow-socfpga/build-scripts/gsrd-16.1/yocto-packages.sh
$ chmod +x yocto-packages.sh
$ sudo ./yocto-packages.sh
Download and Run the Yocto Build Script:
$ wget https://raw.githubusercontent.com/arrow-socfpga/build-scripts/gsrd-16.1/yocto2.2-build
$ chmod +x yocto2.2-build
To see all available build options:
$ ./yocto2.2-build --help
To build the default XFCE image for the Arrow SoCKit board:
$ ./yocto2.2-build --board arrow-sockit
Follow the instructions displayed in the terminal console after the build is complete to copy the generated image to your SD card.
The complete build will take approximately 4 hours or longer depending on your host system specifications.
Modifying the GSRD (Customizing the Yocto BSP)
The Hardware Reference Design is provided as a starting point to demonstrate the hardware features and peripherals available on the board. It is likely that you will want to generate a custom hardware design or modify the provided reference design to accomplish your design goals. Refer to the "Building a Custom Hardware Design, or Modifying the Reference Design" on the Hardware page. Once your hardware design is complete, you will need to make some modifications to the SoCKit Yocto BSP layer to include the hardware components in the software system build.
Resources
The GSRD (Golden System Reference Design) provides a set of essential hardware and software system components that can be used as a starting point for various custom user designs.
Getting Started Guides
SoCKit Quick Start Guide
Do this first
- Image the SD card
- Configure the board
Get your board up and running with two easy setup options:
Connect using a laptop or desktop PC
- Ensure the micro SD card is fully inserted into the board.
- Connect the micro (or mini depending on your kit revision) USB cable between the SoCKit board and PC.
- Plug in the DC power supply.
- Look for a mass storage device in the PC’s file explorer.
- Open the drive and click on start.htm.
- Follow the remaining directions displayed on the webpage.
Screenshot of XFCE Desktop via VNC
Connect using a monitor, keyboard, and mouse
- Ensure the micro SD card is fully inserted into the board.
- Connect a USB OTG cable adapter (micro or mini depending on your kit revision) to the OTG port. Connect a USB hub to the adapter. Connect a keyboard and mouse to the hub. A wireless Bluetooth USB keyboard/mouse dongle may also be used.
- Plug in the DC power supply.
- Connect a VGA cable between the SoCKit board and your LCD Monitor*, then power on the monitor.
* Currently supporting 1080p60 monitor resolution
* Adapter Cables can be purchased here
- USB A Female to Mini USB B
- USB A Female to Micro USB B
Screenshot of XFCE Desktop on 1080p Monitor
Introduction
Arrow is pleased to provide the easiest way to learn about and develop with Altera’s SoC solutions: our SoCKit. The Arrow SoCKit was developed to help engineers take full advantage of these new solutions and help them see how simple designing with these devices can be.
Combining the latest Cortex-A9 embedded cores with industry-leading programmable logic, Altera’s new SoC solutions give you ultimate design flexibility with unparalleled ease. Altera SoC s integrate an ARM-based hard processor system (HPS) consisting of processor, peripherals, and memory interfaces, with the FPGA fabric using a high-bandwidth interconnect backbone. That means you get the performance and power savings of hard Intellectual Property (IP) and the flexibility of programmable logic.
Purchase a kit from parts.arrow.com https://www.arrow.com/en/products/sockit/arrow-development-tools
Key Features
Each SoCKit features:
- Altera Cyclone V SoC with Dual ARM® Cortex®-A9 processors and 110K LEs
- High Speed Mezzanine Connector (HSMC) including transceivers
- Two banks of low-power DDR3 memory
- MicroSD card and Ethernet 10/100/1000 interfaces
- Adjustable clock output by Silicon Labs
- Graphic LCD: 128 x 64 (SPI Interface)
- VGA and Audio connections
- USB 2.0 OTG (Full Speed) and USB to UART connections
- 3-Axis digital accelerometer and temp sensor
- User’s manual/start-up guide, USB and Power Cables
Block Diagram
The
Golden Hardware Reference Design (GHRD) for the Arrow SoCKit Board provides a starter reference design. It includes a Qsys reference design that maps a number of HDL based FPGA peripherals to the HPS and the Cortex-A9 processors. This design is intended as a starting point for new designs.
The current release of the GSRD features two GHRD reference designs.
- Standard GHRD (sockit-ghrd-16.1)
- Standard GHRD with a video pipeline supporting 1080p60 streams (sockit-ghrd-1080p-16.1).
The 1080p example requires a VIP suite IP license in order to generate an rbf file when rebuilding. The github archive does provide a compiled rbf that can be used for demonstration purposes.
Building the Hardware Reference Design
The GHRD can be compiled using the Quartus GUI or from an embedded command shell. Select one of the methods shown below.
- Using the Quartus GUI
- Using make utility
A full build should take between 25 to 60 minutes.
SoCKit Golden System Reference Design (GSRD)
The Golden System Reference Design (GSRD) for the Arrow SoCKit Board consists of a Yocto BSP layer used to build the components required to boot the ARM HPS (Hard Processor System) to Linux. Components of the BSP layer make use of outputs from the Hardware Design (compiled separately).
- Hardware components (precompiled):
- Handoff files
- FPGA programming file (.rbf)
- Software components:
- Device Tree and Device Tree Overlay (.dtb and .dtbo)
- U-Boot v2017.03 (with preloader)
- Linux Kernel v4.1.33-ltsi (zImage)
- Angstrom Distribution v2016.12 Root Filesystem
Building the GSRD
Linux Host Build System Setup
Building the Software Reference Design requires a Linux host (native or Virtual Machine). If you are building using a Virtual Machine, it is recommended that you set the "Number of processor cores" option in your Virtual Machine software settings to the maximum number available. For example, for a quad core CPU with hyper-threading, you would use a setting of 8. The bitbake task execution engine will run multiple processes in parallel, significantly reducing build times. The number of available processor cores is automatically detected and applied in the local.conf file used by the Yocto build system.
Refer to the table below for currently supported and tested host build system Linux distributions for the Yocto Project 2.2:
| Yocto Project 2.2 Supported Distributions |
Status |
|---|
| Ubuntu (14.04, 14.10, 15.04, 15.10, 16.04) |
14.04, 16.04 - PASSED |
| Fedora (22, 23, 24) |
UNTESTED |
| CentOS (7.x) |
7-1611 - PASSED |
| Debian GNU/Linux (8.x Jessie) |
UNTESTED |
| openSUSE 13.2, 42.1 |
13.2, 42.2 - FAILED |
Using the Yocto Build Scripts
Rebuilding the
Golden System Reference Design (GSRD) User Manuals is accomplished by simply running 2 scripts:
- yocto-packages.sh - detects your host build system Linux distribution and installs a set of essential packages required by the Yocto Project 2.2
- yocto2.2-build - Yocto build script that allows you to build individual components or complete image for the Arrow SoCKit board (use --help to see available build options). The output of this script is a complete SD card image that can be copied to a micro SD card and used to boot the board.
Create a Yocto build directory:
$ cd ~
$ mkdir -p work/sockit && cd work/sockit
Install required packages:
$ wget https://raw.githubusercontent.com/arrow-socfpga/build-scripts/gsrd-16.1/yocto-packages.sh
$ chmod +x yocto-packages.sh
$ sudo ./yocto-packages.sh
Download and Run the Yocto Build Script:
$ wget https://raw.githubusercontent.com/arrow-socfpga/build-scripts/gsrd-16.1/yocto2.2-build
$ chmod +x yocto2.2-build
To see all available build options:
$ ./yocto2.2-build --help
To build the default XFCE image for the Arrow SoCKit board:
$ ./yocto2.2-build --board arrow-sockit
Follow the instructions displayed in the terminal console after the build is complete to copy the generated image to your SD card.
The complete build will take approximately 4 hours or longer depending on your host system specifications.
Modifying the GSRD (Customizing the Yocto BSP)
The Hardware Reference Design is provided as a starting point to demonstrate the hardware features and peripherals available on the board. It is likely that you will want to generate a custom hardware design or modify the provided reference design to accomplish your design goals. Refer to the "Building a Custom Hardware Design, or Modifying the Reference Design" on the Hardware page. Once your hardware design is complete, you will need to make some modifications to the SoCKit Yocto BSP layer to include the hardware components in the software system build.
Resources
The GSRD (Golden System Reference Design) provides a set of essential hardware and software system components that can be used as a starting point for various custom user designs.
Getting Started Guides
 Arrow SoCKit Evaluation Board - How to Boot Linux
 Building Bootloader for Stratix10
Building latest bootloaders for Stratix 10 SoC Devices
Building Bootloader for Stratix10
Building latest bootloaders for Stratix 10 SoC Devices Building Bootloader for Agilex 7
Building latest bootloaders for Agilex 7 SoC Devices
Building Bootloader for Agilex 7
Building latest bootloaders for Agilex 7 SoC Devices Building Bootloader for Agilex 5
Building latest bootloaders for Agilex 5 SoC Devices
Building Bootloader for Agilex 5
Building latest bootloaders for Agilex 5 SoC Devices