- Home
- Documentation
- Community
- Projects
- Boards
- Agilex 5 SoC
- Agilex 7 SoC
- Arria 10 SoC
- Nallatech 385A - Arria 10 FPGA Network Accelerator Card
- Nallatech 385A-SoC Accelerator Card with Arria 10 FPGA
- ALARIC Instant DevKit ARRIA 10 SoC FMC IDK by REFLEX CES
- Altera Arria 10 SoC Virtual Platform
- Altera Arria 10 SoC Board
- Nallatech 510T compute acceleration card with Intel Arria 10 FPGA
- REFLEX CES Achilles Arria 10 SoC SOM
- Terasic Arria10 SoC Board : HAN Pilot Platform
- Arria V SoC
- Cyclone V SoC
- Altera Cyclone V SoC Board
- Arrow SoCKit User Manual - July 2017 Edition
- Arrow SoCKit User Manual - November 2019 Edition
- Arrow SoCKit Evaluation Board
- Atlas-SoC Development Platform
- Critical Link MitySOM-5CSx Development Kit
- Cyclone V Ethernet driver problems
- DE10-Nano Development Board
- Terasic DE10-Standard Development Kit
- Devboards DBM-SoC1 module
- Devboards DBM-SoC2 module
- EBV SoCrates Evaluation Board
- Enclustra Mercury SA1 SoC Module
- Enterpoint Drigmorn 5
- Enterpoint Larg 2
- Altera Cyclone V SoC Development Platform
- Mpression Helio SoC Evaluation Kit by Macnica
- Mpression Sodia Evaluation Board by Macnica
- ARIES Embedded - MCV System on Module
- Mpression Borax SOM Module and Development Kit by Macnica
- Enterpoint Mulldonoch 3
- Networked Pro-Audio FPGA SoC Development Kit by Coveloz
- NOVPEK™CVLite
- NOVSOM®CV
- NOVSOM®CVLite
- NovTech IoT Octopus™
- NovTech NetLeap™
- Enterpoint Raggedstone 4
- Solectrix SMARC compliant System-on-Module
- Terasic DE1-SoC Development and Education Board
- Stratix 10 SoC
- Find a Board
- News
Generating U-Boot and U-Boot Device Tree How to generate and build both U-Boot and the U-Boot Device Tree
Configuration
Board(s):
Altera Arria 10 SoC BoardTools Version(s):
15.1.1- Select a different Task
Recent Changes
-
 GSRD for Agilex 7 I-Series Transceiver-SoC DevKit (4x F-Tile)
Golden System Reference Design for DK SI AGI027FB, DK SI AGI027FA and DK SI AGI027FC
GSRD for Agilex 7 I-Series Transceiver-SoC DevKit (4x F-Tile)
Golden System Reference Design for DK SI AGI027FB, DK SI AGI027FA and DK SI AGI027FC -
 Macnica Sulfur ~ Development Kit for Agilex™ 5 FPGA E-Series ~
-
 Building Bootloader for Agilex 5
Building latest bootloaders for Agilex 5 SoC Devices
Building Bootloader for Agilex 5
Building latest bootloaders for Agilex 5 SoC Devices - Ashling RiscFree Examples
-
Intel® Simics® Simulator for Intel FPGAs Release Notes
This page provides release information about the Intel® Simics® simulator for Intel FPGAs.
This page needs tagging. Please add keywords describing what this page is about.
Overview
Important Note: On Arria 10 there are two different Device Trees: one required by Bootloader (U-Boot) and one required by the Linux kernel. The Device Treee referred to in this page is the U-Boot one. Important Note: The U-Boot Device Tree Generation is supported on both Linux and Windows host machines, but U-Boot compilation is supported only on Linux host machines. The following figure presents an overview of the bootloader flow: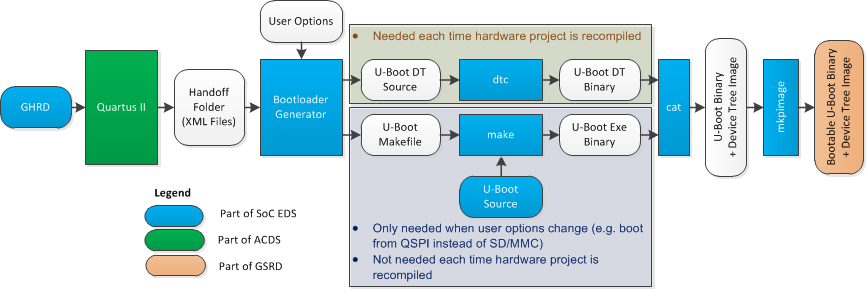 Note that all the operations are automated through the Makefile generated by the Bootloader Generator (BSP Editor in the above figure). Therefore the user does not need to manually call utilities such as "cat' or 'mkpimage' as shown in the figure.
Prerequisites
The following are required- Host PC, running Linux
- SoC EDS 15.1.1 b60
- Already compiled GHRD (the following assume a re-compiled copy of GHRD copied from SoC EDS to the user home folder. But directly using the pre-compiled version that comes with SoC EDS will also work).
Generating Bootloader
This section presents how to run the Bootloader Generator (BSP Editor) to:- Generate the Device Tree
- Generate the U-Boot Makefile
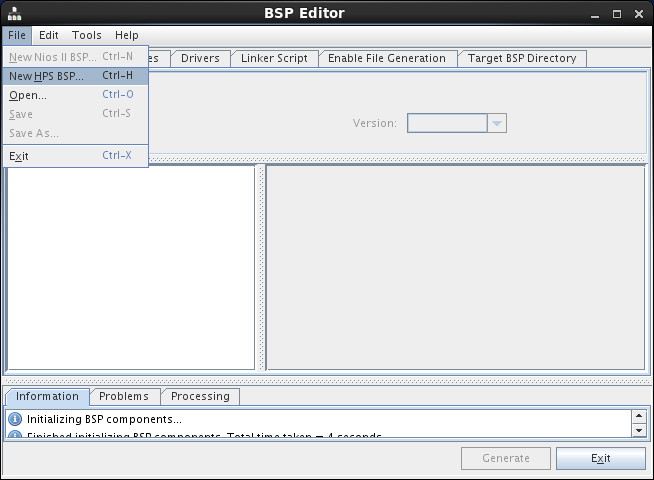
$ ~/altera/15.1/embedded/embedded_command_shell.sh2. Start the BSP Editor:
$ bsp-editor&3. In the BSP Editor window, go to File → New HPS BSP ... This will open the New BSP window.
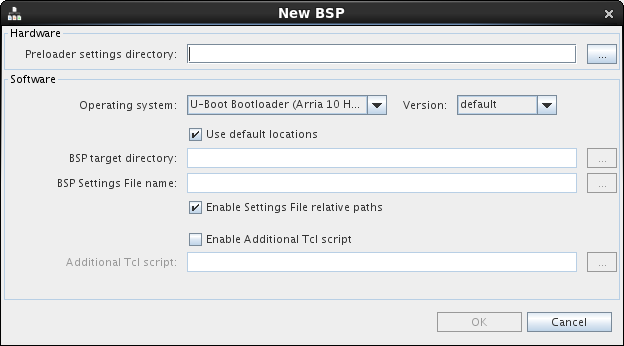
 4. In the New BSP window, click the ... (Browse) button for the Preloader Settings Directory. This will open a file browser window.
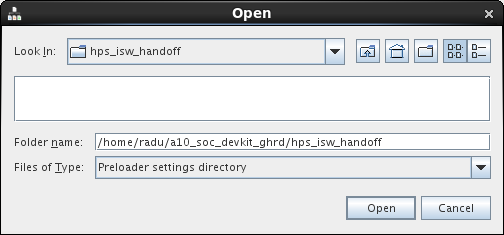
 5. Browse to the folder ~/a10_soc_devkit_ghrd/hps_isw_handoff and click Open to get back to the New BSP window.
 6. In the New BSP window:
 - Select the Operating System to be U-Boot Bootloader (Arria 10 HPS)
- Leave the Use default locations enabled. This will create the new BSP in the ~/a10_soc_devkit_ghrd/software/uboot_bsp folder.
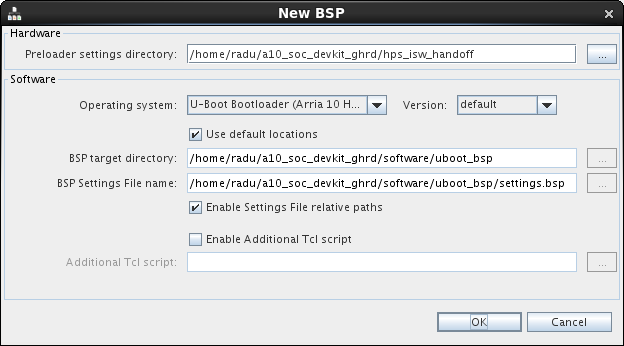 8. Click OK. That will create the BSP settings file and close the New BSP window.
9. Edit BSP settings as follows:
8. Click OK. That will create the BSP settings file and close the New BSP window.
9. Edit BSP settings as follows: - boot_device: Boot from SD/MMC (default)
- model: SOCFPGA Arria 10 <nop>DevKit (default)
- rbf_filename: ghrd_10as066n2.rbf (default)
- disable_ubot_build: unchecked (default)
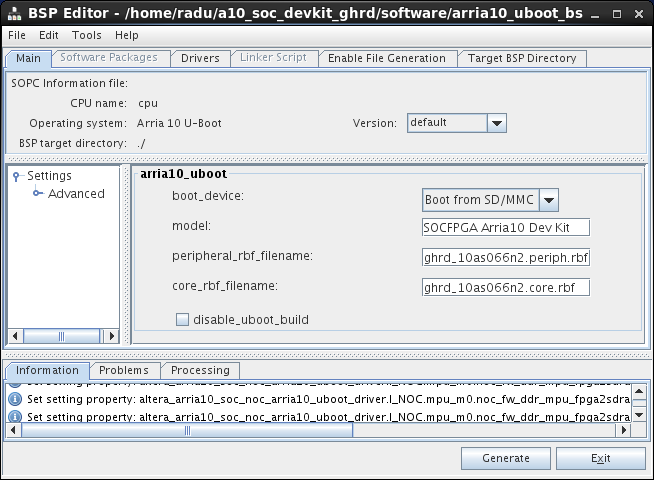 10. In BSP Editor window, click Generate to generate the source code and the U-Boot Device Tree.
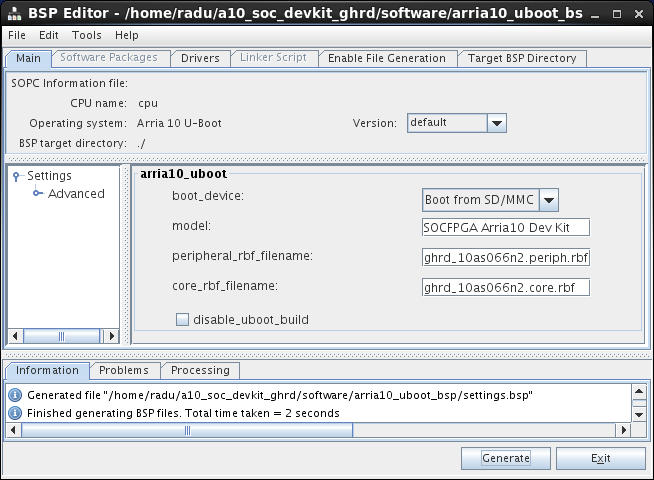 11. In BSP Editor window, click Close to close the generator window.
Creating Bootable Image
This section presents how to:- Build U-Boot
- Compile U-Boot Device Tree Source into Device Tree Binary
- Concatenate U-Boot Binary and Device Tree Binary
- Add BootROM required header to the combined image
$ cd ~/a10_soc_devkit_ghrd/software/uboot_bsp
$ make
This will create the following files in the folder ~/a10_soc_devkit_ghrd/software/uboot_bsp:
- u-boot_w_dtb.bin – concatenation of the U-boot binary and the device tree binary
- uboot_w_dtb-mkpimage.bin – bootable image, containing 4 of the above images, each wrapped with the mkpimage header.
© 1999-2024 RocketBoards.org by the contributing authors. All material on this collaboration platform is the property of the contributing authors.
This website is using cookies. More info.
That's Fine